What is the Visitor design pattern and how to implement it in TS?
Implementing the Visitor design pattern using TypeScript interfaces and classes
Published on 04 Sep, 2021 · 11 min read · 0 reading right now · 1 views
Patterns
Introduction
So, I was reading a chapter from this book called Crafting Interpreters , which had a little section about a design pattern called The Visitor pattern. Now, I don't have much experience with design patterns, because I never really dwelled into Object Oriented stuff and most of my code is based on functions(i guess I can call it functional without the whole scary math stuff).
But coming face to face with this design pattern, I was actually curious about what is this visitor design pattern & what problem it is trying to solve.
This blog is my attempt at explaining about this design pattern. What is it, why do we need it and how can we implement it in TypeScript.
The problem(why?)
Before we explore what this design pattern is, lets first explore why do we even need it?
Note: There will be some OOP concepts and some types system concept like interfaces and abstract classes. Tread carefully, fellow traveller :)
Suppose we have an interface or an abstract class(told ya), and we have a bunch of different classes that implement that interface/abstract class.
argh!, what you do mean!!?
okay, okay, let me try to make it clear for you.
Lets take a classic example of an Animal class. As someone who has watched countless videos on Classes and Objects(OOPs) stuff, the instructor always starts with "Animal class(or a class) is a blueprint...."(i don't even remember what the whole phrase was). Thus, I took this example.
So, you have an abstract class called
Animal
, which has a bunch of abstract methods like
makeSound
,
eatFood
etc.
abstract class Animal {
  abstract makeSound(): string;
  abstract eatFood(): string;
}
and you have a bunch of different animals that extends or "implements" that abstract animal class. For example,
cat
,
dog
,
human
(👀), etc.
class Cat extends Animal {
  makeSound() {
    return "meow";
  }

  eatFood() {
    return "tuna";
  }
}

class Dog extends Animal {
  makeSound() {
    return "woof";
  }

  eatFood() {
    return "chicken";
  }
}

class Human extends Animal {
  makeSound() {
    return "...";
  }

  eatFood() {
    return "¯_(ツ)_/¯"; // for some reason, vscode removes the `\`
  }
}
At this point, we can visualize our classes in a tabular form, where each row is a different class and every column is a method on that class.

Now, here's where the problem arises.
Suppose, now we want to add another method
walk
in our abstract
animal
class, thus we have to implement this
walk
method in
cat
,
dog
and
human
class as well. This means cracking open all our classes and implementing the
walk
method. This is a tedious task because you have to go through each class and implement that method. Also, this violets the
open/closed principle
which states that "software entities should be open for extension, but closed for modification", and by add new methods in our existing class is a violation of "closed for modification" rule.
It would be cool if there was a way to have these methods in a single place(thus making modification a bit easier instead of wading through each class) as well as that doesn't require us to modify the existing class definitions.
Worry not!! We are going to learn how to do this using the Visitor design pattern, next!
To summarize the problem we faced above:
We had a handful of classes and a handful of methods in them. Adding new methods in those classes was a tedious task and violated the open/closed principle.
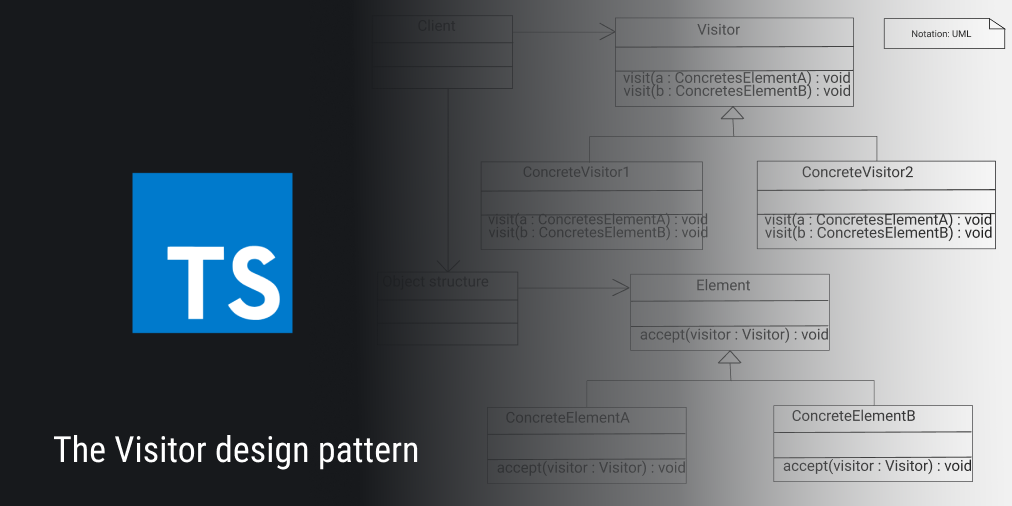
The Visitor pattern
Now that we have seen the problem we face, lets learn what is visitor pattern and how can it be used to solve this problem.
From wikipedia :
In object-oriented programming and software engineering, the visitor design pattern is a way of separating an algorithm from an object structure on which it operates.
A practical result of this separation is the ability to add new operations to existing object structures without modifying the structures.
It is one way to follow the open/closed principle.
This definition is quite good and literally shows the benefits of Visitor Pattern.
First of all, we see that "the visitor design pattern is a way of separating an algorithm from an object structure on which it operates". This means that using the visitor design pattern, we separate a piece of data and the operation we do on that piece. We achieve this by providing a level of indirection in our code(later in the example).
"A practical result of this separation is the ability to add new operations to existing object structures without modifying the structures". This is the reason why we are using the visitor pattern. As I said above, cracking open every class and adding new methods in them gets tedious and violets principles, visitor pattern negates this behavior.
The visitor pattern also allows us to define methods relating to different classes in a single place(no hard rule though, it depends on you), which makes adding new methods to existing classes a lot easier.
So, we have seen what visitor pattern does and why should we use it, but, WHAT is this visitor pattern? Show me the damn code!
Fear not, cause I have an example just to see this pattern in action.
Example
We will take an example of
Cars
. I chose this example just because I feel like this example or something close to this example is what we will encounter most in real life and setting up a more concrete real-life example would take more code than I intend to add in this blog :)
Scenario
Lets setup a scenario for our example.
Imagine we want to buy 3 cars(I said imagine) namely BMW, Mercedes, & Bugatti(thanks duckduckgo).
We assume that each car has different purchase price, different repairing costs, etc. Given a maximum amount we can spend, we'd like to know if we can afford a car or not. How would we map the max amount we can spend to these purchase & repair costs, and get different output based on whether the given price is more than we can afford?
Well, the obvious way would be to make classes based on given cars and add methods into them.
class BMWCar {
  getPrice() {
    // ...your code
  }
  getRepairCost() {
    // ...your code
  }
}
// similar classes for Mercedes and Bugatti car as well
But as we saw above, this is a tedious task(imagine going through every class and adding a new method in them especially if those classes are in different files) & not recommended for a bunch of reasons.
Therefore, we will use the Visitor Pattern instead.
The Visitor Pattern way
The code will be written in TypeScript and since the whole thing would not be good to fit into a single blog post, I made a Github repository containing all the code. Check it out here .
Directory structure
Here's how our directory structure will look like(I have omitted some files for the sake of verbosity):
.
├── cars
│   ├── Car.ts          # the car interface
│   ├── BMWCar.ts       # BMW car class
│   ├── MercedesCar.ts  # Mercedes car class
│   └── BugattiCar.ts   # Bugatti car class
├── costs
│   ├── CostsVisitor.ts       # Visitor interface
│   ├── RepairCostVisitor.ts  # Repair cost visitor class
│   └── PurchaseVisitor.ts    # Purchase cost visitor class
└── runner.ts   # Responsible for combining the classes and their visitors
Making Car interface and corresponding classes
Let us make an
interface
for a car first(we can use an
abstract
class instead of an interface here, as well).
// Car.ts
export interface Car {
  getPrice(): number;
  getRepairCost(): number;
  accept(v: any): void; // using `any` for now
}
Make note of the
accept(v: any)
line. We will revisit it to make some changes.
Next up, we implement the
car
interface into our different cars class.
// import statements omitted

// BMWCar.ts
export class BMWCar implements Car {
  getPrice(): number {
    return 2; // as in 2 millions
  }

  getRepairCost(): number {
    return 0.7;
  }
}

// MercedesCar.ts
export class MercedesCar implements Car {
  getPrice(): number {
    return 4;
  }

  getRepairCost(): number {
    return 0.8;
  }
}

// BugattiCar.ts
export class BugattiCar implements Car {
  getPrice(): number {
    return 5;
  }

  getRepairCost(): number {
    return 1;
  }
}
Notice that we don't implement the
accept
function yet. We will come back to it later.
What have we done at this point?
We made a
carinterface which contains all the methods that are common to all the cars that implement that interface.We made 3 car classes namely
BMWCar,MercedesCar&BugattiCar. Added common method in them except theacceptmethod which we will add later.
Implementing the visitors
Next up, we make an interface which we call
CostsVisitor
. This interface is responsible for holding all the visitors functions definitions that our different visitor classes will implement(check below).
// CostsVisitor.ts
export interface CostsVisitor {
  visitBMWCar(v: BMWCar): void;
  visitMercedesCar(v: MercedesCar): void;
  visitBugattiCar(v: BugattiCar): void;
}
Aside from the weird
visit
and
Visitor
names, this interface is pretty straightforward. We have 3 functions definitions which take a parameter
v
whose type maps to their corresponding car class.
What's in the name?
These weird names like
accept,visitandVisitorcan be confusing at first, but that's just the conventions of naming methods and interfaces in the Visitor pattern. It helps when someone else familiar with the Visitor Pattern will read our code, they will be able to understand what these methods do.As for us, to provide some "meaning" to these "weird" names, we can think of them as:
acceptaccepts a visitor(as a welcoming in a visitor)
visitvisits a particular class
visitorhas a bunch of visit methods
Now, we are going to implement the Purchase visitor and Repair cost visitor. These are just classes that implement functions that will check whether we can afford to buy a car as well as repair it. These classes implement our
CostsVisitor
interface.
// PurchaseVisitor.ts
export class PurchaseVisitor implements CostsVisitor {
  maxAffordablePrice: number;
  constructor(maxPrice: number) {
    this.maxAffordablePrice = maxPrice;
  }

  visitBMWCar(v: BMWCar) {
    const cost = v.getPrice();
    if (cost > this.maxAffordablePrice) {
      console.log("Cannot buy BMW Car");
      return;
    }
    console.log("Purchased BMW");
  }

  visitMercedesCar(v: MercedesCar) {
    const cost = v.getPrice();
    if (cost > this.maxAffordablePrice) {
      console.log("Cannot buy Mercedes Car");
      return;
    }
    console.log("Purchased Mercedes");
  }

  visitBugattiCar(v: BugattiCar) {
    const cost = v.getPrice();
    if (cost > this.maxAffordablePrice) {
      console.log("Cannot buy Bugatti Car");
      return;
    }
    console.log("Purchased Bugatti");
  }
}
This is a pretty straightforward class. We implement the
visit
methods in them, and right now, they are just checking whether the car price is more than we can afford or not, and respectively
console.log
ing that message.
Next, we implement the Repair Cost visitor class.
// RepairCostVisitor.ts
export class RepairCostVisitor implements CostsVisitor {
  maxAffordableRepairCost: number;
  constructor(maxCost: number) {
    this.maxAffordableRepairCost = maxCost;
  }

  visitBMWCar(v: BMWCar) {
    const cost = v.getPrice();
    if (cost > this.maxAffordableRepairCost) {
      console.log("Cannot repair BMW");
      return;
    }
    console.log("Repaired BMW");
  }

  visitMercedesCar(v: MercedesCar) {
    const cost = v.getPrice();
    if (cost > this.maxAffordableRepairCost) {
      console.log("Cannot repair Mercedes");
      return;
    }
    console.log("Repaired Mercedes");
  }

  visitBugattiCar(v: BugattiCar) {
    const cost = v.getPrice();
    if (cost > this.maxAffordableRepairCost) {
      console.log("Cannot repair Bugatti");
      return;
    }
    console.log("Repaired Bugatti");
  }
}
This one is similar as the last one. We just check whether the repair cost is more than we can afford, and console.log that corresponding messages.
This is what we meant by "having all your logic in one place". We are implementing this Purchase cost checker and Repair cost checker for all the different classes in a single place(or in a single class).
So far, so good?
What have we done till this point?
We made a new
Visitorinterface that contains a bunch of function(/methods) that different classes have to implement.We made two classes based on the
Visitorinterface namelyPurchaseVisitorwhich implements the logic of purchasing a car andRepairCostVisitorwhich implements the logic of repairing a car.Don't be overwhelmed by these new infos. If you kinda ignore the weird names, you can see how straightforward this all is. Also, we haven't really seen how this will all work together, so hold on for now.
Re-visiting our previous class
Remember when I said, "We don't implement the
accept
function yet. We will come back to it later"(
Refresh your memory
). Well, nows the time to revisit those cars classes.
Fixing the car interface
We used
any
in our
Car
interface, so now we are going to replace
any
with
CostsVisitor
interface.
// Car.ts
export interface Car {
  getPrice(): number;
  getRepairCost(): number;
  accept(v: CostsVisitor): void; // change this line
}
Adding the
accept
method in our classes
Next up, we implement the
accept
method in all our cars classes.
// BMWCar.ts
export class BMWCar implements Car {
  getPrice() {
    return 2;
  }

  getRepairCost() {
    return 0.7;
  }

  accept(v: CostsVisitor) {
    // add ths method
    v.visitBMWCar(this);
  }
}

// MercedesCar.ts
export class MercedesCar implements Car {
  getPrice() {
    return 4;
  }

  getRepairCost() {
    return 0.8;
  }

  accept(v: CostsVisitor) {
    // add ths method
    v.visitMercedesCar(this);
  }
}

// BugattiCar.ts
export class BugattiCar implements Car {
  getPrice() {
    return 5;
  }

  getRepairCost() {
    return 1;
  }

  accept(v: CostsVisitor) {
    // add ths method
    v.visitBugattiCar(this);
  }
}
This part is little bit weird. We add the
accept
method which takes a parameter
v
as the
CostsVisitor
interface & inside each function, we call the corresponding visitor method for each class, and pass
this
(the object instance) as the argument. This will all make sense when we wire it all up.
Wiring it all up
Now's the time that we combine all these interfaces & classes, and see it in action. Here's the code for it:
// runner.ts
import { BMWCar } from "./cars/BMWCar";
import { BugattiCar } from "./cars/BugattiCar";
import { MercedesCar } from "./cars/MercedesCar";

import { RepairCostVisitor } from "./costs/RepairCostVisitor";
import { PurchaseVisitor } from "./costs/PurchaseVisitor";

const purchaseVisitor = new PurchaseVisitor(2); // we can afford to spend 2 millions to purchase a car
const repairCostVisitor = new RepairCostVisitor(3); // we can afford to spend 3 millions to repair a car

const bmwCar = new BMWCar();
const bugattiCar = new BugattiCar();
const mercedesCar = new MercedesCar();

// when purchasing a car
bmwCar.accept(purchaseVisitor);
bugattiCar.accept(purchaseVisitor);
mercedesCar.accept(purchaseVisitor);

// when repairing a car
bmwCar.accept(repairCostVisitor);
bugattiCar.accept(repairCostVisitor);
mercedesCar.accept(repairCostVisitor);
Output:
// Purchase
Purchased BMW
Cannot buy Bugatti Car
Cannot buy Mercedes Car

// Repair
Repaired BMW
Cannot repair Bugatti
Cannot repair Mercedes
Here's the quick rundown of what's happening here:
-
We first instantiate the visitor classes as well as the car classes.
-
We pass the visitor instance in the
acceptmethod of various car objects.
You can now go ahead, compile the TypeScript code and start hacking on it.
How does this work?
The best way to know what's going on here is to visualize it. Here's a little visualization that shows how everything is working.
For calculating the purchase code

For calculating the repair cost

We see that we invoke the
accept
method of our car instance, passing in the desired visitor we want our car instance to interact with. If we want to know the purchase price, we pass in the
purchaseVisitor
& if we want to know the repair cost, we pass in the
repairCostVisitor
.
If we were to make a new method, we never have to touch those classes, instead make a new visitor and just plug that in inside the
accept
function. See how easy it is to add/remove new methods. Neat!
This is the Visitor design pattern. Again, you can find the code for this blog here .
Good stuff!
TL;DR
We saw the visitor design pattern, why it is used and how can one use it.
It took me longer than I anticipated to write this blog but this blog post helped me understand this pattern a bit more. So, that's good.
Alright, that's it folks! Thanks for sticking till the end :)
Keep visiting!(bad pun, sorry not sorry :P)
Further reading
Some other resources to understand the Visitor pattern: